Pop!_OS Overview
Pop!_OS is a user-friendly Linux distribution developed by System76, based on Ubuntu. It is designed to provide a smooth out-of-the-box experience, particularly for developers, engineers, and users working with graphics-intensive applications. Pop!_OS includes built-in support for NVIDIA GPUs, a customized GNOME-based desktop (COSMIC), and a curated set of tools aimed at productivity and system stability.
The strength of Pop!_OS lies in its balance between usability and performance. It offers a polished desktop environment, reliable package management through APT, and strong hardware compatibility, making it an excellent choice for both beginners and experienced users. On the downside, it provides less low-level customization compared to Arch Linux, and its release cycle does not deliver updates as rapidly as rolling-release distributions.
Pre-Installation
Before beginning the installation, download the Pop!_OS ISO image and create a bootable USB drive.
Download the ISO Image
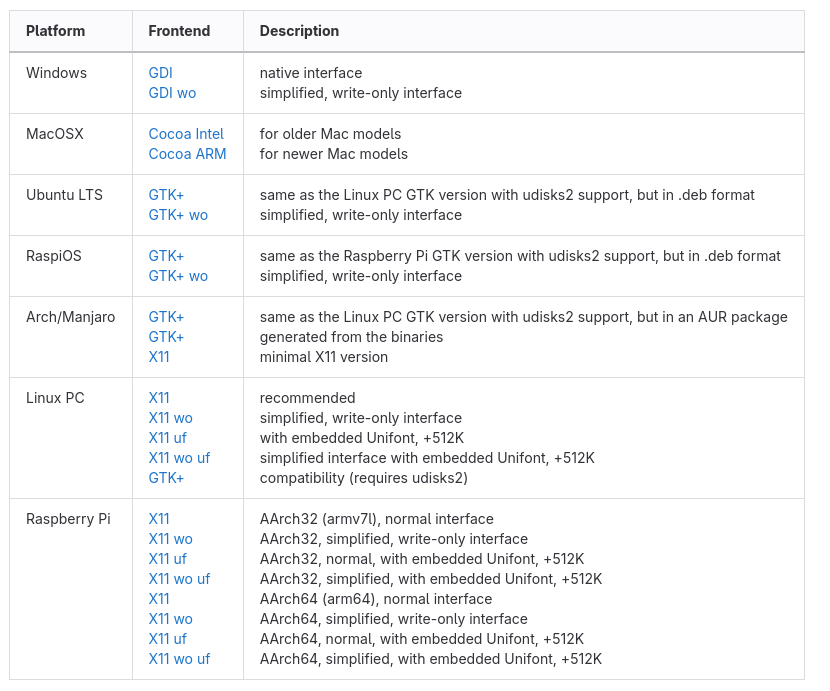
Navigate to the Pop!_OS download page.
Available options include:
Intel/AMD (Standard) — for most systems
NVIDIA — for systems with NVIDIA GPUs
Raspberry Pi — for ARM-based devices
Select the appropriate version and download the ISO file.
Flash the ISO to a USB Drive
Use a tool such as USB Imager to create a bootable USB.
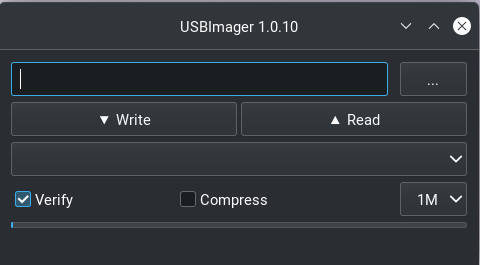
Steps:
Select the downloaded
.isofileSelect the USB drive
Enable Verify
Click Write
Warning
All data on the USB drive will be erased.
Installation
Booting the Installer
Insert the USB drive and power on the system. Enter the boot menu
(commonly accessed via F2, F10, F12, or DEL).
Select the USB device.
Expected option:
Pop!_OS install medium (x86_64, UEFI)
Select and press Enter.
Installer Workflow
The Pop!_OS graphical installer will guide you through:
Language and keyboard selection
Network configuration
Disk selection
Installation type
Disk Encryption (Recommended)
Enable full disk encryption unless you have a specific reason not to.
Expected behavior:
System prompts for encryption password at boot
Disk is automatically configured with encryption
Complete Installation
Follow the remaining prompts to:
Create a user account
Set a password
Complete installation
Once complete:
Remove the USB drive
Reboot
Expected result:
System boots into the Pop!_OS desktop
Login screen appears
Post Installation
This section describes how to install core packages for a development environment on Pop!_OS. Configuration of these tools is handled in System.
Update System
Update package lists and upgrade installed packages:
sudo apt update
sudo apt upgrade
Install Core Packages
Install commonly used utilities:
sudo apt install \
    git gh \
    fzf bat tree htop btop \
    zsh tmux rsync \
    xclip fail2ban \
    libreoffice neofetch
Verify installation:
git --version
gh --version
zsh --version
GitHub Setup
Authenticate GitHub CLI:
gh auth login
Follow the prompts to authenticate.
Update Terminal
Pop!_OS includes a capable terminal by default through the COSMIC desktop
environment. However, this guide uses ghostty as the preferred terminal.
Install ghostty with the following command:
/bin/bash -c "$(curl -fsSL https://raw.githubusercontent.com/mkasberg/ghostty-ubuntu/HEAD/install.sh)"
Development Directory Structure
Create development directories:
mkdir -p ~/Code_Dev/{Python,C,C++,OS}
Install Google Chrome
Download the Debian package from:
Install:
cd ~/Downloads
sudo apt install ./google-chrome-stable_current_amd64.deb
Install Fonts
Create fonts directory:
mkdir -p ~/.fonts
Download fonts from:
Install fonts:
unzip <font>.zip -d ~/.fonts
fc-cache -fc
Install Neovim
Install Neovim from the official release:
mkdir -p ~/.local/bin
cd ~/.local/bin
curl -LO https://github.com/neovim/neovim/releases/latest/download/nvim-linux-x86_64.tar.gz
tar xzf nvim-linux-x86_64.tar.gz
ln -sf ~/.local/bin/nvim-linux-x86_64/bin/nvim ~/.local/bin/nvim
Note
Ensure ~/.local/bin is in your PATH:
export PATH="$HOME/.local/bin:$PATH"
Install Node.js and Tree-sitter
curl -fsSL https://deb.nodesource.com/setup_lts.x | sudo -E bash -
sudo apt install nodejs
npm install -g tree-sitter-cli
Install tmux
sudo apt install tmux
Install LaTeX
sudo apt install texlive-latex-base texlive-fonts-recommended texlive-fonts-extra
System Utilities
Install additional tools:
sudo apt install snapd